Search This Blog

Install TOSHIBA eStudio 4540c printer on CentOS 6 Linux

  1. Download CUPS driver from Toshiba web site:
    wget http://www.eid.toshiba.com.au/drivers/eBX/eBX_CUPS_Colour_V7.13.zip
  2. Extract and install the driver (as root/sudo):
    unzip eBX_CUPS_Colour_V7.13.zip
    cp eBX_CUPS_Colour_V7.13/normal/TOSHIBA_ColorMFP_CUPS.tar /tmp/
    rm -fr eBX_CUPS_Colour_V7.13
    cd /; sudo tar -xvf /tmp/TOSHIBA_ColorMFP_CUPS.tar
  3. Extract and rename the ppd file:
    cp /usr/share/cups/model/Toshiba/TOSHIBA_ColorMFP_CUPS.gz ~/Downloads
    cd ~/Downloads; gunzip ~/Downloads/TOSHIBA_ColorMFP_CUPS.gz; mv ~/Downloads/TOSHIBA_ColorMFP_CUPS ~/Downloads/TOSHIBA_ColorMFP_CUPS.ppd
    
  4. Install system-config-printer (if not installed yet):
    sudo yum install system-config-printer
  5. Go to system menu: System -> Administration -> Printing, then New Printer
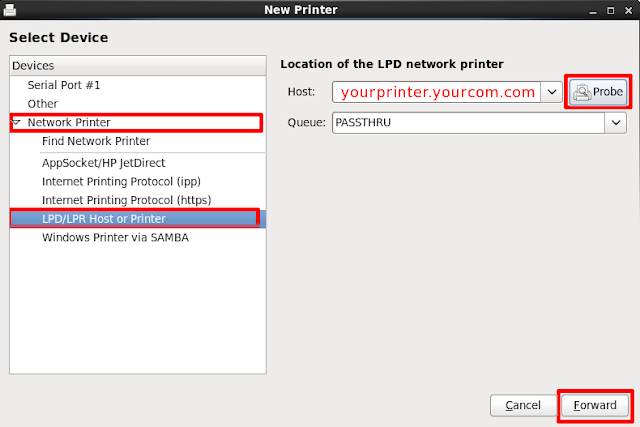
  6. Select Network Printer, then LPD/LPR Host or Printer, type your printer host/ip address then click Probe button, when the Queue is detected, click Forward button.
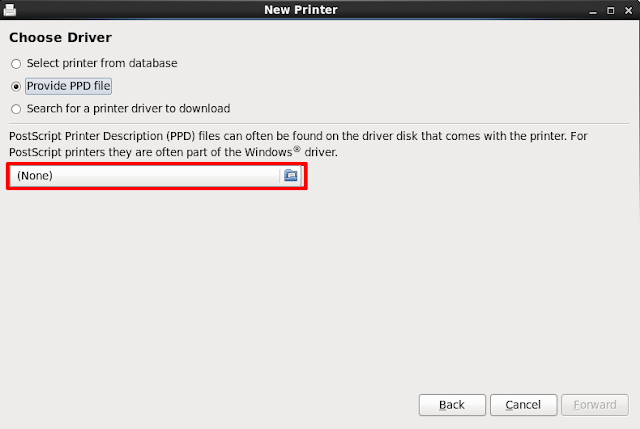
  7. Select Provide PPD file and select the PPD file:
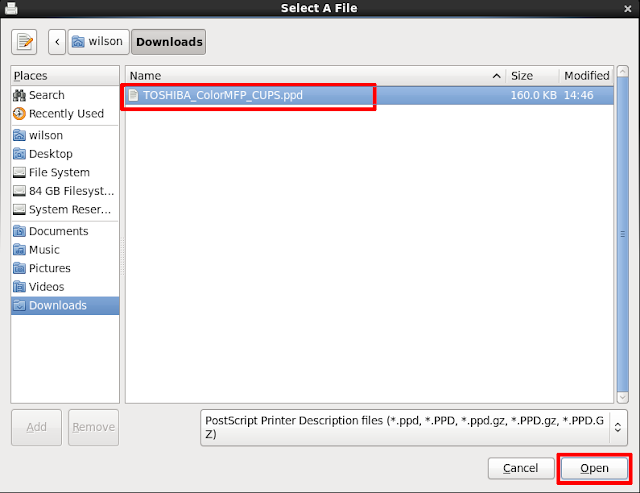
  8. Select the TOSHIBA_ColorMFP_CUPS.ppd file:
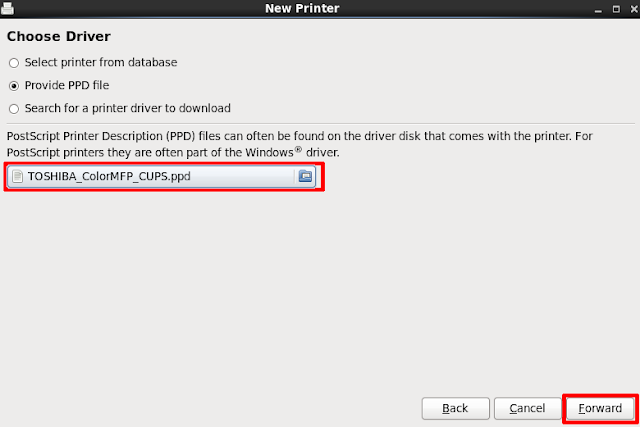
  9. Click Forward button to proceed:
  10. Set Model Selection to TOSHIBA e-STUDIO4540CSeries and click Forward:
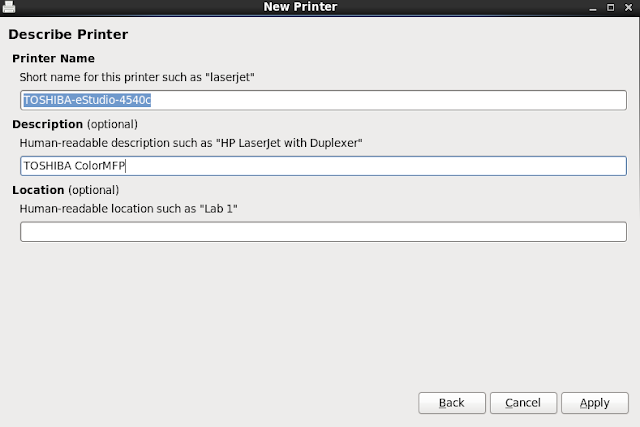
  11. Set Printer name, description and location information, and click Apply button:

How to enable Department Code?

  1. Open http://localhost:631/printers in your web browser
  2. Click to select the Toshiba eStudio 4540c printer
  3. Select Maintenance and then Set Default Options
  4. Click Printing Modes

    then enable Department Code:
  5. Click Printing Modes DC then set the Department Code (DC) digits, and finally cick Set Default Options to save.

Setup HTTP proxy in Eclipse

  • Window (on Mac OS, Eclipse) -> Preferences -> General -> Network connections
  • Change Active Provider to Manual and set the proxies like below:

yum: list packages installed from specific repository

sudo yum list installed | grep repo-name

Install shutter screen capture tool on CentOS 6

Shutter is considered the best screen capture tool for Linux. To install it on CentOS:
  • Enable epel repository
  • Enable nux-desktop repository:
    sudo rpm -Uvh http://li.nux.ro/download/nux/dextop/el6/$(uname -m)/nux-dextop-release-0-1.el6.nux.noarch.rpm
  • Install shutter:
    sudo yum install shutter

Enable EPEL repository on CentOS 6

  • Install epel-release repository:
    sudo rpm -Uvh http://dl.fedoraproject.org/pub/epel/6/$(uname -m)/epel-release-6-8.noarch.rpm
    After installation, you should be able to see it in the repository list:
    sudo yum repolist
  • (According to this) Install Priorities:
    sudo yum install yum-plugin-priorities
  • Set the priorities of epel to 50 (low priority) (see how to set repository priorities)
    sudo vi /etc/yum.repos.d/epel.repo
    priority=50

Install file-roller archive manager on CentOS 6

If file-roler archive manager is not installed, you won't be able open/extract zip/tar archives in your file manager. Run the following command to install file-roller archive manager:
sudo yum install file-roller
After installation, you can right click an archive then select Archive Manager to open it.

Install gnome-screenshot on CentOS 6

The screen capture utility gnome-screenshot is now loaded by default. It is included in the package gnome-utils, run the following command to install it:
sudo yum install gnome-utils

Compile and install Keepassx on CentOS 6

  • Install the required packages for compiling keepassx:
    sudo yum groupinstall "Development Tools"
    sudo yum install qt qt-devel libXi-devel libXtst-devel gcc gcc-c++
  • Download the source code from http://www.keepassx.org/downloads:
    wget http://downloads.sourceforge.net/keepassx/keepassx-0.4.3.tar.gz
  • Extract the source code:
    tar zxvf keepassx-0.4.3.tar.gz
  • Compile the source code, and install it (as root) to /usr/local:
    cd keepassx-0.4.3
    qmake-qt4 PREFIX=/usr/local
    make
    sudo make install
    
  • To start KeepassX: type keepassx in a Terminal window. Or go to system menu: Applications -> Accessories -> KeePassX

Enable RPMForge Repository on CentOS 6

  1. Import the key of the RPMForge repository:
    sudo rpm --import http://apt.sw.be/RPM-GPG-KEY.dag.txt
  2. Download the repository RPM:
    wget http://pkgs.repoforge.org/rpmforge-release/rpmforge-release-0.5.3-1.el6.rf.$(uname -m).rpm
  3. Verify the downloaded RPM package:
    rpm -K rpmforge-release-0.5.3-1.el6.rf.$(uname -m).rpm
  4. Install the RPM package:
    sudo rpm -i rpmforge-release-0.5.3-1.el6.rf.$(uname -m).rpm

Calculus 1 in 20 minutes (微积分)

Mount a FAT 32 partition writable on Linux

  • Edit /etc/fstab and add the following line:
    /dev/hda5    /win32data   vfat   rw,noatime,uid=500,gid=500,user   0 0
    where /dev/hda5 is the FAT32 partition, and uid=500,gid=500 will make the user(uid=500) be the owner of the mounted partition.

How to change MAC address on CentOS Linux

  1. Edit /etc/sysconfig/network-scripts/ifcfg-eth0,
    sudo vi /etc/sysconfig/network-scripts/ifcfg-eth0
    and add the MAC address in the following format:
    MACADDR=00:11:22:33:44:55
    
  2. Restart the network:
    sudo service network restart

NOTE:

The above assumes you want to change ethernet interface eth0. You need to change the interface name if it is not eth0. (e.g. eth1)

If /etc/sysconfig/network-scripts/ifcfg-eth0 does not exist, you may need to create one. Here is an example:
DEVICE=eth0
BOOTPROTO=static
ONBOOT=yes
IPADDR=192.168.0.199
NETMASK=255.255.255.0
GATEWAY=192.168.0.1
MACADDR=00:11:22:33:44:55
DNS1=123.111.222.1
or if use dhcp:
DEVICE=eth0
BOOTPROTO=dhcp
ONBOOT=yes
MACADDR=00:11:22:33:44:55

Check the gateway address on Linux

  • Method 1:
    netstat -nr
  • Method 2:
    route -nee
  • Method 3:
    ip route show

Install DropBox on CentOS Linux

If your computer has direct internet connection

  1. Download the rpms for Fedora from dropbox.com:
    • 32 bit:
      wget -c https://www.dropbox.com/download?dl=packages/fedora/nautilus-dropbox-1.6.0-1.fedora.i386.rpm
    • 64 bit:
      wget -c https://www.dropbox.com/download?dl=packages/fedora/nautilus-dropbox-1.6.0-1.fedora.x86_64.rpm
  2. Install the rpm:
    sudo rpm -Uvh nautilus-dropbox-1.6.0-1.fedora.*.rpm
  3. Select Applications->Internet->DropBox from the system menu to download and install dropbox.
  4. Fix the yum repository error. Installing the rpm above will, however, cause the yum update fail:
    $ sudo yum update
    Loaded plugins: fastestmirror, refresh-packagekit, security
    Loading mirror speeds from cached hostfile
     * base: centos.mirror.uber.com.au
     * extras: centos.mirror.crucial.com.au
     * updates: centos.mirror.serversaustralia.com.au
    http://linux.dropbox.com/fedora/6/repodata/repomd.xml: [Errno 14] PYCURL ERROR 22 - "The requested URL returned error: 404 Not Found"
    Trying other mirror.
    Error: Cannot retrieve repository metadata (repomd.xml) for repository: Dropbox. Please verify its path and try again
     

    To fix the error:
    sudo vim /etc/yum.repos.d/dropbox.repo
      [Dropbox]  
      name=Dropbox Repository
      #baseurl=http://linux.dropbox.com/fedora/$releasever/
      baseurl=http://linux.dropbox.com/fedora/19/  
      gpgkey=http://linux.dropbox.com/fedora/rpm-public-key.asc


If you computer is behind proxy or firewall

You need to download and install DropBox via Command Line:
  1. Download and extract DropBox into your home directory:
    • 32 bit:
      cd ~ && wget -O - "https://www.dropbox.com/download?plat=lnx.x86" | tar xzf -
      
    • 64 bit:
      cd ~ && wget -O - "https://www.dropbox.com/download?plat=lnx.x86_64" | tar xzf -
      
  2. Run the Dropbox daemon from the newly created .dropbox-dist folder.
    ~/.dropbox-dist/dropboxd &

Install Skype on CentOS

http://wiki.centos.org/HowTos/Skype

Windows 7/8: how to configure windows update via http proxy

I. Set the proxy

  • Run Command Prompt as Administrator, and type the following command:
    netsh winhttp set proxy yourproxy.yourdomain.com:3128
    or the following command to import the proxy settings from Internet Explorer settings:
    netsh winhttp import proxy source=ie

II. Show current proxy settings

  • Run Command Prompt as Administrator, and type the following command:
    netsh winhttp show proxy

III. Reset the proxy

  • Run Command Prompt as Administrator, and type the following command:
    netsh winhttp reset proxy

GWT 2.5.0: gwtc failed: java.lang.RuntimeException: Unexpected IOException on in-memory stream

Got following error when compiling a GWT project using GWT 2.5.0:
[INFO]    [ERROR] Unexpected internal compiler error
[INFO] java.lang.RuntimeException: Unexpected IOException on in-memory stream
[INFO]  at com.google.gwt.dev.javac.CompilationUnit.getTypes(CompilationUnit.java:360)
Work around is remove gwt-unitCache folder.