make[1]: Entering directory '/usr/lib/parallels-tools/kmods/prl_fs/SharedFolders/Guest/Linux/prl_fs'
make -C /lib/modules/5.0.0-25-generic/build M=/usr/lib/parallels-tools/kmods/prl_fs/SharedFolders/Guest/Linux/prl_fs CC=cc
make[2]: Entering directory '/usr/src/linux-headers-5.0.0-25-generic'
  CC [M]  /usr/lib/parallels-tools/kmods/prl_fs/SharedFolders/Guest/Linux/prl_fs/super.o
/usr/lib/parallels-tools/kmods/prl_fs/SharedFolders/Guest/Linux/prl_fs/super.c: In function 'prlfs_remount':
/usr/lib/parallels-tools/kmods/prl_fs/SharedFolders/Guest/Linux/prl_fs/super.c:119:21: error: 'MS_RDONLY' undeclared (first use in this function); did you mean 'IS_RDONLY'?
  if ( (!((*flags) & MS_RDONLY) && PRLFS_SB(sb)->readonly) ||
                     ^~~~~~~~~
                     IS_RDONLY
/usr/lib/parallels-tools/kmods/prl_fs/SharedFolders/Guest/Linux/prl_fs/super.c:119:21: note: each undeclared identifier is reported only once for each function it appears in
/usr/lib/parallels-tools/kmods/prl_fs/SharedFolders/Guest/Linux/prl_fs/super.c:120:21: error: 'MS_MANDLOCK' undeclared (first use in this function); did you mean 'IS_MANDLOCK'?
         ((*flags) & MS_MANDLOCK) )
                     ^~~~~~~~~~~
                     IS_MANDLOCK
/usr/lib/parallels-tools/kmods/prl_fs/SharedFolders/Guest/Linux/prl_fs/super.c:123:12: error: 'MS_SYNCHRONOUS' undeclared (first use in this function); did you mean 'SB_SYNCHRONOUS'?
  *flags |= MS_SYNCHRONOUS; /* silently don't drop sync flag */
            ^~~~~~~~~~~~~~
            SB_SYNCHRONOUS
/usr/lib/parallels-tools/kmods/prl_fs/SharedFolders/Guest/Linux/prl_fs/super.c: In function 'prlfs_fill_super':
/usr/lib/parallels-tools/kmods/prl_fs/SharedFolders/Guest/Linux/prl_fs/super.c:277:17: error: 'MS_NOATIME' undeclared (first use in this function); did you mean 'S_NOATIME'?
  sb->s_flags |= MS_NOATIME | MS_SYNCHRONOUS;
                 ^~~~~~~~~~
                 S_NOATIME
/usr/lib/parallels-tools/kmods/prl_fs/SharedFolders/Guest/Linux/prl_fs/super.c:277:30: error: 'MS_SYNCHRONOUS' undeclared (first use in this function); did you mean 'SB_SYNCHRONOUS'?
  sb->s_flags |= MS_NOATIME | MS_SYNCHRONOUS;
                              ^~~~~~~~~~~~~~
                              SB_SYNCHRONOUS
scripts/Makefile.build:284: recipe for target '/usr/lib/parallels-tools/kmods/prl_fs/SharedFolders/Guest/Linux/prl_fs/super.o' failed
make[3]: *** [/usr/lib/parallels-tools/kmods/prl_fs/SharedFolders/Guest/Linux/prl_fs/super.o] Error 1
Makefile:1606: recipe for target '_module_/usr/lib/parallels-tools/kmods/prl_fs/SharedFolders/Guest/Linux/prl_fs' failed
make[2]: Leaving directory '/usr/src/linux-headers-5.0.0-25-generic'
make[2]: *** [_module_/usr/lib/parallels-tools/kmods/prl_fs/SharedFolders/Guest/Linux/prl_fs] Error 2
/usr/lib/parallels-tools/kmods/prl_fs/SharedFolders/Guest/Linux/prl_fs/Makefile.v26:13: recipe for target 'all' failed
make[1]: Leaving directory '/usr/lib/parallels-tools/kmods/prl_fs/SharedFolders/Guest/Linux/prl_fs'
make[1]: *** [all] Error 2
Makefile.kmods:49: recipe for target 'compile' failed
make: Leaving directory '/usr/lib/parallels-tools/kmods'
make: *** [compile] Error 2
Error: could not build kernel modules
Error during report about failed installation of parallels tools.
Error: failed to install Parallels Guest Tools!
2019-08-27T11:19:22+0800: Started installation of Parallels Guest Tools version '14.1.3.45485'

Error during report about start installation of parallels tools.
Tue Aug 27 11:19:19 CST 2019
Start installation or upgrade of Guest Tools
Makefile:223: ================= WARNING ================
Makefile:224: 'SUBDIRS' will be removed after Linux 5.3
Makefile:225: Please use 'M=' or 'KBUILD_EXTMOD' instead
Makefile:226: ==========================================
/usr/lib/parallels-tools/kmods/prl_fs/SharedFolders/Guest/Linux/prl_fs/super.c: In function 'prlfs_remount':
/usr/lib/parallels-tools/kmods/prl_fs/SharedFolders/Guest/Linux/prl_fs/super.c:119:21: error: 'MS_RDONLY' undeclared (first use in this function); did you mean 'IS_RDONLY'?
  if ( (!((*flags) & MS_RDONLY) && PRLFS_SB(sb)->readonly) ||
                     ^~~~~~~~~
                     IS_RDONLY
/usr/lib/parallels-tools/kmods/prl_fs/SharedFolders/Guest/Linux/prl_fs/super.c:119:21: note: each undeclared identifier is reported only once for each function it appears in
/usr/lib/parallels-tools/kmods/prl_fs/SharedFolders/Guest/Linux/prl_fs/super.c:120:21: error: 'MS_MANDLOCK' undeclared (first use in this function); did you mean 'IS_MANDLOCK'?
         ((*flags) & MS_MANDLOCK) )
                     ^~~~~~~~~~~
                     IS_MANDLOCK
/usr/lib/parallels-tools/kmods/prl_fs/SharedFolders/Guest/Linux/prl_fs/super.c:123:12: error: 'MS_SYNCHRONOUS' undeclared (first use in this function); did you mean 'SB_SYNCHRONOUS'?
  *flags |= MS_SYNCHRONOUS; /* silently don't drop sync flag */
            ^~~~~~~~~~~~~~
            SB_SYNCHRONOUS
/usr/lib/parallels-tools/kmods/prl_fs/SharedFolders/Guest/Linux/prl_fs/super.c: In function 'prlfs_fill_super':
/usr/lib/parallels-tools/kmods/prl_fs/SharedFolders/Guest/Linux/prl_fs/super.c:277:17: error: 'MS_NOATIME' undeclared (first use in this function); did you mean 'S_NOATIME'?
  sb->s_flags |= MS_NOATIME | MS_SYNCHRONOUS;
                 ^~~~~~~~~~
                 S_NOATIME
/usr/lib/parallels-tools/kmods/prl_fs/SharedFolders/Guest/Linux/prl_fs/super.c:277:30: error: 'MS_SYNCHRONOUS' undeclared (first use in this function); did you mean 'SB_SYNCHRONOUS'?
  sb->s_flags |= MS_NOATIME | MS_SYNCHRONOUS;
                              ^~~~~~~~~~~~~~
                              SB_SYNCHRONOUS
make[3]: *** [/usr/lib/parallels-tools/kmods/prl_fs/SharedFolders/Guest/Linux/prl_fs/super.o] Error 1
make[2]: *** [_module_/usr/lib/parallels-tools/kmods/prl_fs/SharedFolders/Guest/Linux/prl_fs] Error 2
make[1]: *** [all] Error 2
make: *** [compile] Error 2
Error: could not build kernel modules
Error during report about failed installation of parallels tools.
Error: failed to install Parallels Guest Tools!
2019-08-27T11:19:22+0800: execCmd: ./install --install [167]
2019-08-27T11:19:22+0800: Error: An error occurred when installing Parallels Tools. Please go to /var/log/parallels-tools-install.log for more information.
2019-08-27T11:20:01+0800: Exiting with code 1
To workaround it, use the script below:
Showing posts with label centos. Show all posts
Showing posts with label centos. Show all posts
Install Parallel Tools on Rocky Linux VM
Got the following error when installing Parallel tools on Rocky Linux 8 VM:

Setup Centos Linux VM and enable Nomachine remote desktop
- Setup ssh access to the Linux VM:
ssh ec2-user@centos_vm_2020
- Create user account:
sudo dnf install zsh
sudo useradd -s /bin/zsh wxyz
sudo usermod -a -G adm wxyz
sudo usermod -a -G wheel wxyz
- Enable ssh public key authentication (add public key to ~/.ssh/authorized.keys):
sudo su wxyz
mkdir ~/.ssh
vim ~/.ssh/authorized_keys
chmod 700 ~/.ssh/authorized_keys
- Install GUI desktop:
sudo dnf groupinstall Workstation
- Install nomachine:
cd /tmp
wget https://download.nomachine.com/download/6.9/Linux/nomachine_6.9.2_1_x86_64.rpm
sudo rpm -i /tmp/nomachine_6.9.2_1_x86_64.rpm
- Reboot the VM:
sudo systemctl set-default multi-user.target
sudo systemctl isolate multi-user.target
sudo reboot
- Install gnome-tweaks:
sudo dnf install gnome-tweaks
and tweak the desktop environment on CentOS 8. - Enable Nomachine public key authentication (add public key to ~/.NX/config/authorized.crt):
mkdir -p ~/.NX/config
touch ~/.NX/config/authorized.crt
chmod 700 ~/.NX/config/authorized.crt
Redhat/CentOS: X11 forwarding request failed on channel 0
Was trying to forward xdisplay back to local computer from the remote a Redhat 6.5 server via SSH,
ssh -X user@remote-redhat-server
xterm
got the following error:
X11 forwarding request failed on channel 0
Solution:
- Login the remote Redhat server via ssh:
ssh user@remote-redhat-server
- Enable X11 forwarding in /etc/ssh/sshd_config:
sudo vi /etc/ssh/sshd_config
X11Forwarding yes
X11UseLocalhost no
- Install xauthroity:
sudo yum install xauth
- Important: Reload ssh server:
sudo /etc/init.d/ssh reload
Openbox/LXDE: default key combinations (shortcut keys)
Openbox default key combinations
- Alt-F4 Close the active window
- Alt-Space Show the client menu for the active window
- Alt-Tab Cycle between windows on the desktop
- Alt-Shift-Tab Cycle between windows on the desktop in reverse order
- Control-Alt-Tab Cycle between panel and desktop windows on the desktop
- Windows-D Hide all windows to show the desktop
- Windows-E Run the Konqueror file manager (This is an example of how to run a program with a key binding)
- Alt-Escape Lower the active window behind other windows, and activate the last window that was in use
- Windows-F1 Go to the first desktop instantly
- Windows-F2 Go to the second desktop instantly
- Windows-F3 Go to the third desktop instantly
- Windows-F4 Go to the fourth desktop instantly
- Control-Alt-Left Open the desktop switching dialog, to go to the desktop to the left of the current one
- Control-Alt-Right Open the desktop switching dialog, to go to the desktop to the right of the current one
- Control-Alt-Up Open the desktop switching dialog, to go to the desktop above the current one (This will only be useful if you use a pager to set up a desktop layout with multiple rows)
- Control-Alt-Down Open the desktop switching dialog, to go to the desktop below the current one (This will only be useful if you use a pager to set up a desktop layout with multiple rows)
- Shift-Alt-Left Open the desktop switching dialog, to go to the desktop to the left of the current one, and bring the active window with you
- Shift-Alt-Right Open the desktop switching dialog, to go to the desktop to the right of the current one, and bring the active window with you
- Shift-Alt-Up Open the desktop switching dialog, to go to the desktop above the current one, and bring the active window with you (This will only be useful if you use a pager to set up a desktop layout with multiple rows)
- Shift-Alt-Down Open the desktop switching dialog, to go to the desktop below the current one, and bring the active window with you (This will only be useful if you use a pager to set up a desktop layout with multiple rows)
- Alt-Left mouse button Move a window
- Alt-Right mouse button Resize a window. The window is resized towards the edge that the mouse is nearest to. So use Alt-Right mouse button in the top right corner of a window to resize that corner.
- Alt-Scroll wheel Change desktops forward and backward
Mount NTFS partition on CentOS 6
- Enable epel repository
sudo yum install ntfs-3g ntfsprogs
- edit /etc/fstab and add
UUID=F8D22D76D22D39F0 /windows ntfs-3g rw,uid=500,gid=500,umask=007,locale=en_US.utf8 0 0
where you can get the uuid of the partition fromblkid
command. - If you want to create a NTFS partition, remember it type number is 7
- If you want to format a NTFS partition, you need to install ntfsprogs package, run command
sudo yum install ntfsprogs; sudo mkfs.ntfs /dev/sda6
Install FreeNX server on CentOS 6
Under construction
sudo yum install nx freenx
sudo vi /etc/nxserver/node.conf
DEFAULT_X_SESSION=/etc/X11/xinit/Xsession
COMMAND_XTERM=gnome-terminal
COMMAND_SMBMOUNT=/bin/mount
COMMAND_SMBUMOUNT=/bin/umount
sudo vi /usr/bin/nxloadconfig
APPLICATION_LIBRARY_PRELOAD=/usr/lib64/NX/lib/libX11.so.6.2:/usr/lib64/NX/lib/libXext.so.6.4:/usr/lib64/NX/lib/libXcomp.so.3:/usr/lib64/NX/lib/libXcompext.so.3:/usr/lib64/NX/lib/libXrender.so.1
Install Chinese input method on CentOS 6
sudo yum install ibus ibus-gtk ibus-qt ibus-pinyin im-chooser
ibus-setup
vi ~/.bashrc
and addexport GTK_IM_MODULE=ibus export XMODIFIERS=@im=ibus export QT_IM_MODULE=ibus
Install Oracle Java 7 on CentOS 6
- Download the latest Java 7 JDK from Oracle.
- If your computer is intel 32 bit, download jdk-7uXX-linux-i586.rpm
- If your computer is intel 64 bit, download jdk-7uXX-linux-x64.rpm
- Install the rpm:
sudo yum install jdk-7u*.rpm
- Run the following script to update the java alternatives to use the ones from the newly installed JDK 7:
- Add
export JAVA_HOME=/usr/java/latest
to /etc/bashrc
See Also
Set up http proxy on CentOS 6.4
- Set up system wide proxy: System -> Preferences -> Network Proxy

- Edit /etc/environment:
sudo vi /etc/environment
and add lines like below:http_proxy=http://192.168.20.10:3128 https_proxy=https://192.168.20.10:3128 ftp_proxy=ftp://192.168.20.10:3128 rsync_proxy=http://192.168.20.10:3128 no_proxy="localhost,127.0.0.1,localaddress,.localdomain.com" HTTP_PROXY=http://192.168.20.10:3128 HTTPS_PROXY=https://192.168.20.10:3128 FTP_PROXY=ftp://192.168.20.10:3128 RSYNC_PROXY=http://192.168.20.10:3128 NO_PROXY="localhost,127.0.0.1,localaddress,.localdomain.com"
- Edit /etc/bashrc:
sudo vi /etc/bashrc
and append lines:export http_proxy=http://192.168.20.10:3128 export https_proxy=https://192.168.20.10:3128 export ftp_proxy=ftp://192.168.20.10:3128 export rsync_proxy=http://192.168.20.10:3128 export no_proxy="localhost,127.0.0.1,localaddress,.localdomain.com" export HTTP_PROXY=http://192.168.20.10:3128 export HTTPS_PROXY=https://192.168.20.10:3128 export FTP_PROXY=ftp://192.168.20.10:3128 export RSYNC_PROXY=http://192.168.20.10:3128 export NO_PROXY="localhost,127.0.0.1,localaddress,.localdomain.com"
- Set yum proxy: edit /etc/yum.conf
sudo vi /etc/yum.conf
and add line:proxy=http://192.168.20.10:3128
- Keep proxy settings through sudo:
sudo visudo
and add the following line:Defaults env_keep += "http_proxy https_proxy ftp_proxy no_proxy"

See also
CentOS 6.4 Installation Notes
- Setup network: System -> Preferences -> Network connections or simply run the following command in terminal:
sudo nm-connection-editor
- Enable sudo without passwd:
sudo visudo
and append line:username ALL=(ALL) NOPASSWD:ALL
- Install and enable rpmforge repositories
- Install epel repositories and set their priorities
- Set up http proxy
- Configure printer:
sudo yum install system-config-printer
sudo system-config-printer
or System -> Administration -> Printing- Configure Toshiba eStudio 4540C
- Install Oracle Java 7
- Install Skype
- Install Dropbox
- Install KeepassX
- Install VirtualBox
- Install unrar, p7zip and file-roller (unrar is to extract .rar archives, p7zip is to extract .7z archives and file-roller is the gui archive manager). You need to enable rpmforge repository(see step 3) to install these packages:
sudo yum install unrar p7zip file-roller
- Install openssh-server
- Install LibreOffice:
sudo yum install libreoffice-core libreoffice-writer libreoffice-impress libreoffice-calc
- Install gnome-screenshot:
sudo yum install gnome-utils -y
- Install Firefox addons: xmarks, lastpass
- Install flash plugin
- Install ibus and pinyin Chinese input method
- Install git
sudo yum install git
- Install FreeNX server
- Download and install NoMachine NX client
sudo rpm -Uvh http://web04.nomachine.com/download/3.5.0/Linux/nxclient-3.5.0-7.x86_64.rpm
- Download and install Ubuntu font:
cd ~/Downloads; wget http://font.ubuntu.com/download/ubuntu-font-family-0.80.zip
sudo mkdir /usr/share/fonts/ubuntu; cd /usr/share/ubuntu
sudo unzip ~/Downloads/ubuntu-font-family-0.80.zip
sudo mkfontdir; sudo mkfontscale; sudo fc-cache -fv
- Mount Window FAT32 partition:
sudo vi /etc/fstab
and add the line like below:/dev/sda5 /windows vfat rw,uid=500,gid=500,umask=077 0 0
then runsudo mount -a
- Mount NTFS partition
Install virtualbox on CentOS 6
- Install dkms package from rpmforge repository
yum --enablerepo rpmforge install dkms
If you have not yet install rpmforge repository, see How to install rpmforge repository on CentOS. - Dowload the repository file into /etc/yum.repos.d:
wget -O /etc/yum.repos.d/virtualbox.repo http://download.virtualbox.org/virtualbox/rpm/rhel/virtualbox.repo
- Update the packages:
yum update
- Find the latest VirtualBox package:
yum search VirtualBox
- Install the latest VirtualBox package:
yum install VirtualBox-4.2
- Start virtualbox, Applications -> System Tools -> Oracle VM VirtualBox
- Troubleshooting
- USB (Keyboard) subsystem not working, solution:
sudo usermod -a -G vboxusers yourusername
then log out and log back in.
- USB (Keyboard) subsystem not working, solution:
Install Flash plugin on CentOS 6
- Add Adobe repository:
sudo rpm -ivh http://linuxdownload.adobe.com/adobe-release/adobe-release-$(uname -m)-1.0-1.noarch.rpm
sudo rpm --import /etc/pki/rpm-gpg/RPM-GPG-KEY-adobe-linux
- Install the required packages:
sudo yum check-update
sudo yum groupinstall "Sound and Video"
- Install flash plugin:
sudo yum install flash-plugin nspluginwrapper curl
Install latest Firefox on CentOS Linux
- Download the latest Firefox from http://download.cdn.mozilla.net/pub/mozilla.org/firefox/releases/. The current (British English, 64 bit) one is firefox-23.0.1.tar.bz2:
cd ~/Downloads; wget http://download.cdn.mozilla.net/pub/mozilla.org/firefox/releases/23.0.1/linux-x86_64/en-GB/firefox-23.0.1.tar.bz2
- Extract it into /opt:
cd /opt; sudo tar jxvf ~/Downloads/firefox-*.tar.bz2
- To start in Terminal:
/opt/firefox/firefox
You can also create launcher for it... - Link the plugin directory:
cd ~/.mozilla; ln -s /usr/lib64/mozilla/plugins
Install Chromium/Chrome browser on CentOS
You can run the following command to add the repository and install the chromium package:
cd /etc/yum.repos.d; sudo wget http://people.centos.org/hughesjr/chromium/6/chromium-el6.repo
sudo yum update
sudo yum install chromium
NOTE:
if you have yum-plugin-priorities installed, you need tosudo echo "priority=1" >> /etc/yum.repos.d/chromium-el6.repoto set the repository priority.
See also
Install TOSHIBA eStudio 4540c printer on CentOS 6 Linux
- Download CUPS driver from Toshiba web site:
wget http://www.eid.toshiba.com.au/drivers/eBX/eBX_CUPS_Colour_V7.13.zip
- Extract and install the driver (as root/sudo):
unzip eBX_CUPS_Colour_V7.13.zip
cp eBX_CUPS_Colour_V7.13/normal/TOSHIBA_ColorMFP_CUPS.tar /tmp/
rm -fr eBX_CUPS_Colour_V7.13
cd /; sudo tar -xvf /tmp/TOSHIBA_ColorMFP_CUPS.tar
- Extract and rename the ppd file:
cp /usr/share/cups/model/Toshiba/TOSHIBA_ColorMFP_CUPS.gz ~/Downloads
cd ~/Downloads; gunzip ~/Downloads/TOSHIBA_ColorMFP_CUPS.gz; mv ~/Downloads/TOSHIBA_ColorMFP_CUPS ~/Downloads/TOSHIBA_ColorMFP_CUPS.ppd
- Install system-config-printer (if not installed yet):
sudo yum install system-config-printer
- Go to system menu: System -> Administration -> Printing, then New Printer
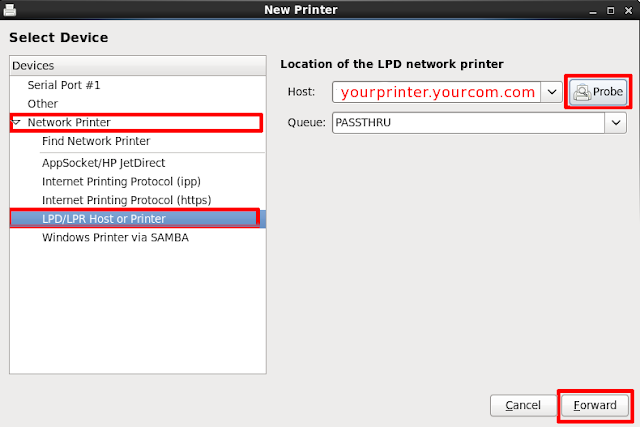
- Select Network Printer, then LPD/LPR Host or Printer, type your printer host/ip address then click Probe button, when the Queue is detected, click Forward button.
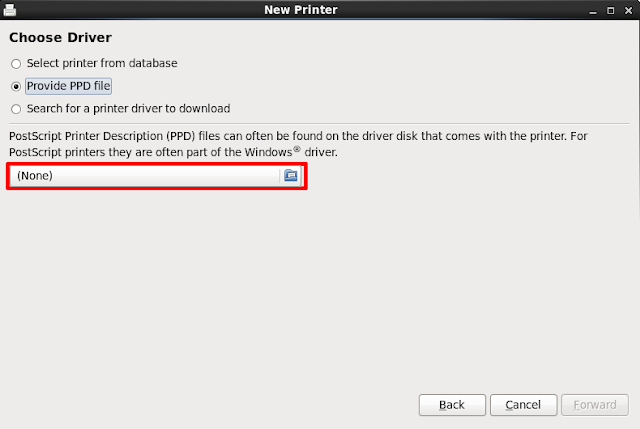
- Select Provide PPD file and select the PPD file:
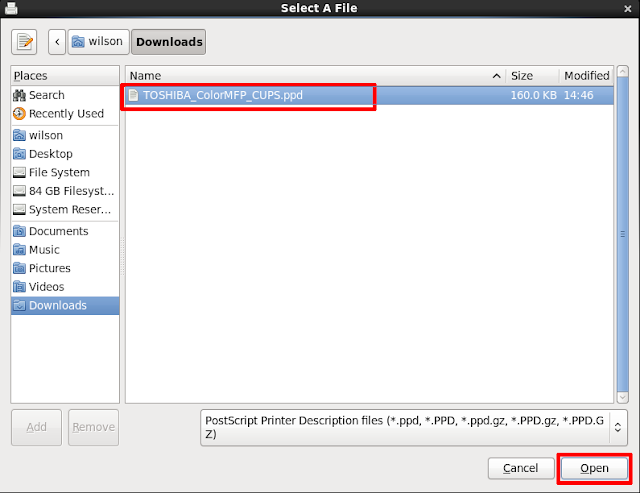
- Select the TOSHIBA_ColorMFP_CUPS.ppd file:
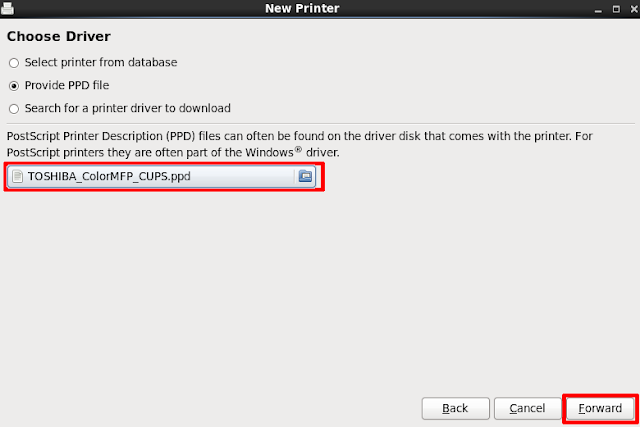
- Click Forward button to proceed:
- Set Model Selection to TOSHIBA e-STUDIO4540CSeries and click Forward:
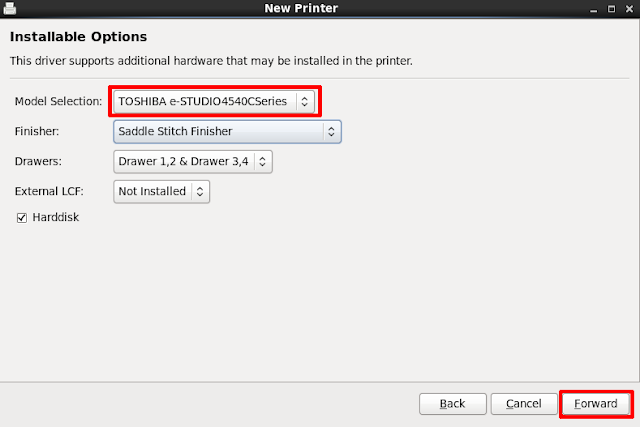
- Set Printer name, description and location information, and click Apply button:
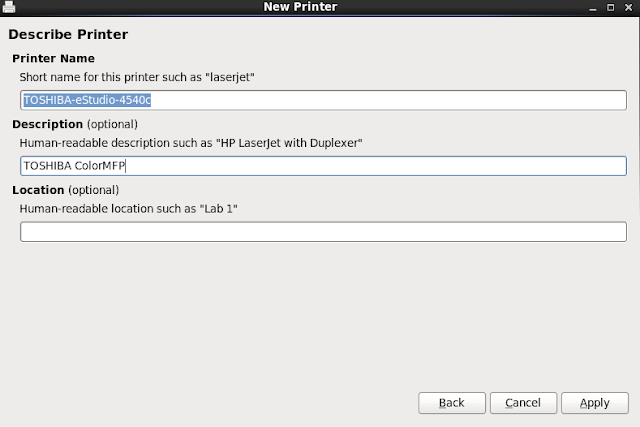


How to enable Department Code?
- Open http://localhost:631/printers in your web browser
- Click to select the Toshiba eStudio 4540c printer
- Select Maintenance and then Set Default Options

- Click Printing Modes

then enable Department Code:
- Click Printing Modes DC then set the Department Code (DC) digits, and finally cick Set Default Options to save.


Install shutter screen capture tool on CentOS 6
Shutter is considered the best screen capture tool for Linux. To install it on CentOS:
- Enable epel repository
- Enable nux-desktop repository:
sudo rpm -Uvh http://li.nux.ro/download/nux/dextop/el6/$(uname -m)/nux-dextop-release-0-1.el6.nux.noarch.rpm
- Install shutter:
sudo yum install shutter
Subscribe to:
Posts (Atom)